ADVERTISEMENT
Instructions:
- Activate the yeast: In a small bowl, combine the yeast with 1/4 cup of warm water (around 110°F). Stir in a pinch of sugar and let it sit for about 5-10 minutes until it becomes frothy. This indicates that the yeast is active and ready to use.
- Prepare the dough: In a large mixing bowl, combine the flour, sugar, and salt. Make a well in the center and pour in the activated yeast mixture, along with the milk. Use a wooden spoon or your hands to mix everything together until a rough dough forms.
- Knead the dough: Transfer the dough to a lightly floured surface and knead it for about 8-10 minutes until it becomes smooth and elastic. This helps develop the gluten in the dough, resulting in a better texture for the bread.
- Let the dough rise: Place the kneaded dough in a clean, lightly oiled bowl. Cover it with a kitchen towel or plastic wrap and let it rise in a warm, draft-free place for about 1-2 hours, or until it doubles in size. This allows the yeast to ferment and leaven the dough.
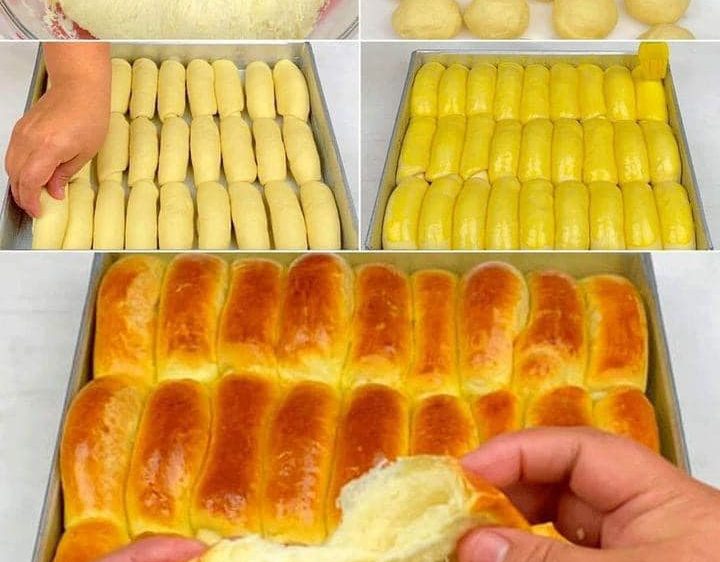
- Shape the bread: Once the dough has risen, punch it down to release any air bubbles. Transfer it to a lightly floured surface and shape it into a loaf. You can either shape it into a traditional loaf shape or divide it into smaller portions to make individual rolls.
- Second rise: Place the shaped loaf or rolls onto a baking sheet lined with parchment paper. Cover them loosely with a kitchen towel and let them rise for an additional 30-45 minutes. This second rise allows the dough to relax and further develop its flavor.
- Preheat the oven: While the dough is rising, preheat your oven to 375°F (190°C).
- Bake the bread: Once the dough has completed its second rise, place it in the preheated oven and bake for 25-30 minutes, or until the bread is golden brown and sounds hollow when tapped on the bottom.
- Butter glaze: While the bread is still warm, melt the unsalted butter in a small saucepan over low heat. Brush the melted butter over the top of the bread to give it a glossy finish and added flavor.
- Serve and enjoy: Allow the bread to cool slightly before slicing it. Serve it warm with a generous spread of butter if desired. Enjoy your delicious homemade bread with milk and butter!
Tips and Variations:
- For a richer flavor, you can use whole milk instead of regular milk.
- Feel free to experiment with different types of flour, such as whole wheat or bread flour, for a different texture and flavor profile.
- Add a sprinkle of your favorite herbs or spices, such as rosemary or garlic powder, to the dough for extra flavor.
- If you prefer sweeter bread, you can increase the amount of sugar in the recipe to suit your taste.
- Leftover bread can be stored in an airtight container at room temperature for up to 3-4 days, or frozen for longer storage.
Conclusion:
This bread with milk and butter recipe is a simple yet satisfying treat that is perfect for any occasion. Whether enjoyed fresh out of the oven or toasted with a pat of butter, this bread is sure to delight your taste buds and warm your heart. Give this recipe a try and experience the comforting goodness of homemade bread at its finest.
ADVERTISEMENT


